Monday 26 March 2012

Project 52 - A Year of Inspiration Weeks Eight to Ten

Nearly all caught up with Project 52 postings lol
Week Eight
Challenge, Technique - Sponging and Doodling; Journalling - Find something random in your house and tell us about it


I really enjoyed creating this tag, I sponged ink over a cogs and gears mask to create the background and doodled around Mater to complete the technique challenge.   Mater was a stocking stuffer for my darling hubby for Xmas 2009, it has lived on the top of our fridge ever since.   I love that the black ribbon resembles a road.


Week Nine
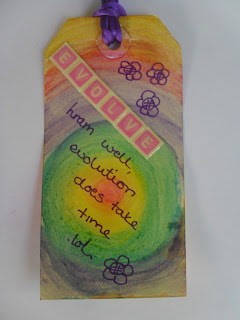
Challenge Technique - Colour with watercolour crayons or pencils; Journalling - go back to your original word and journal your progress.


I do like the soft rainbow effect of the watercolour pencils, but I obviously need more practise with them to get a smoother result.   "Hrmm, well evolution does take time" I must refocus and get on with attempting to sell my products.


Week Ten

Challenge, Technique - Sewing on the tag; Journalling - was to again reexamine our original word.


I have quite often been tempted to sew on a layout or OTP project but never have so it was good to be challenged to do it this week.   I used a zigzag stitch as a border and also sewed the 'clothes' to the mannequin.   As a side note the burgundy material was a scrap left from my wedding dress and the cream was leftover from the girls bridesmaids dresses.
I decided to score myself out of ten for the three parts of evolve that I had outlined in week two, Organise 6/10, Overcome 3/10, Orchestrate 0/10, so that's 9/30 a fail in any one's language lol.


Well we're almost caught up the next post on this subject, weeks 11 - 13 will bring us totally up to date.

Enjoy Art Every Day

Love Deb xoxo

Thursday 22 March 2012

Project 52 - A Year of Inspiration Weeks Five to Seven

Week Five
Challenge Technique - Use pages from an old book, "white wash' with acrylic paint, add stencil patterns and rubons; Journalling - write about what you are feeling


You can just see the text peeking through from under my acrylic paint layer, I used stencils as masks to apply Tim Holtz Distress Ink and then used the same ink on some floral stamps. I certainlly journalled how I was feeling as after many good days I had a really bad back this week.   The ribbon is seam binding sprayed with diluted Bundled Sage ink, I then crupled it a little before letting it air dry.


Week Six
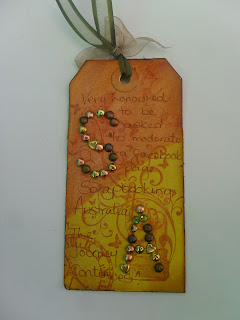
Challenge, Technique - Use brads to make a shape; Journalling - a favourite song


As you can see I used the brads to make letters to represent a facebook page Scrapbooking Australia that I have been asked to be an administrator for.    The tag was actually created at a lesson at Paper Flourish, the best scrap store in the north, using Tim Holtz Distress Stains and Inks and some lovelly stamps.


Week Seven

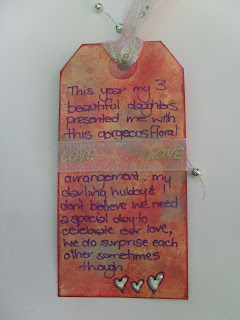
Challenge Technique - Use stash bits to decorate, Journalling - what does Valentines Day mean to you.


Distress Ink to colour the background, Liquid Pearls to create the heart shapes and ribbons from my stash.   This year my three beautiful daughters presented me with this gorgeous floral arrangement.

Wednesday 21 March 2012

Project 52 - Weeks One to Four

Hi bloggers,

I wanted to let you know about a challenge I am involved in this year on the Soul Scrappers site, called Project 52 - A Year of Inspiration, this challenge was created by Erika Martin who was inspired by Emily Falconbridge's 52 Questions. Each week Erika presents us with a tag to inspire our own creation with both a technique and journalling challenge. How closely we stick to these is up to us.

I have been doing this for 10 weeks now, so have a few to catch you up on, I will endeavour to post future tags as I create them.

Week one
Challenge - to create a cover tag,
Technique - open; Journalling - choose a word that can be like a 'mantra' for the year ahead.


Week One - The Cover

Week One Reverse


I chose the word 'Evolve'  The tag reads "This year I want to evolve my craft.   Take it forward from being a fantastic hobby to the next step.    (Oh and learn to stamp straight lol).


Week 2
Challenge Technique - to use words torn from books ( I decided not to);   Journalling - expand on the word that you chose in week one.


This week I expanded on my word Evolve, outling the Steps I need to make to get there.   
Organise, Overcome & Orchestrate.  
Organise - I need to organise my life so that the things that need to be done take a minimum amount of time, leaving me with more time to do the things I want.
Overcome - the fear that my work is not good enough
Orchestrate - the plan to sell my craft and maybe get on a Design Team.


Week Three
Challenge Technique - produce a Zentagram, basically doodling with intent, theres heaps of information about them on the net, pop Zentagram into your search engine.   Journalling - how we feel about our word.


I really enjoyed creating the Zentagram, just picking up the pen and doodling a little at a time over 3 days.  I decided to use this tag to record some great things that freinds and aquaintances sadi to me this week, a message from the universe maybe.


Week Four
Challenge Technique - Paper Tearing: Journalling - a favourite quote


This week I used the tag to record the weeks events  as we celebrated Australia Day.


Friday 17 February 2012

Tim's 12 Tags of 2012 February

Hello bloggers, its great to be back on line and finally able to post, I've had a busy few weeks craft wise and will catch you all up on everything over the next few days.

First i want to share with you my latest project.   I'm participating in Tim Holtz 12 Tags of 2012.    Last year I made almost all of his 12 tags of Christmas, I'll share them with you at some stage.   Tim has decided to give his yearly treat a bit of a twist and has come up with the 12 Tags of 2012, one tag per month for the year, rather than one tag a day for the first 12 days of December. Check out his blog here -  Tim's blog.  

So we started with February and will catch up January at a later date.


This is Tim's Tag for February


and this is mine 


As some of the products and tools Tim used aren't available in Australia (or my stash) at the moment I had to get creative.   I had some fun thinking way outside the box to make the red heart element, and a few other bits required some clever thinking.


Here is a list of what Tim used and what I replaced it with.
.
Tim - distress ink  - fired brick/barn door/aged mahogany/worn lipstick/festive berries/frayed burlap;
Deb - distress ink - festive berries and Ingvild Bloom chalk ink - raspberry pie and rose bud.

Tim -  distress stickles/barn door;          Deb - distress stickles - xmas red

Tim -  distress stain/spun sugar;             Deb - distress ink - festive berries

Tim -  seasonal salvage stickers;            Deb - Adage ticket and letters from stash

Tim - trinket pins;          Deb - safety pin coloured with alcohol ink, cranberry and gold mixative

Tim - Tim's trimmings;          Deb - ribbon from stash

Tim -  dies/mini love struck          Deb - cupid sticker stuck to grungeboard

Tim - die/mini hearts          Deb - cut heart freehand

Tim - die/vintage lace;          Deb - Martha Stewart lace punch and lace ribbon sticker from stash

Tim - texture fades/valentines;          Deb - did not emboss

Tim - stamps/valentines silhouette;          Deb - various love stamps from stash

Tim - honeycomb paper          Deb - one of those party straws with the fruit around the top


Both - paint dabber/snow cap; mister; heat tool; craft sheet; ink blending tool; glossy accents; #8 manila tag; sanding grip; grungeboard; baubles; philosophy tag; tissue tape; kraft core; grid-blocks; scissors; paper distresser;


As I said I had to fudge my way around things, Tim used a matching stamp and embossing folder, as I don't have any I stamped with love stamps and decided not to emboss at all.

I used a cupid sticker as I don't own the cupid die, I stuck into onto grunge board and cut around it before inking and stickling.

I think my solution to having no honeycomb paper is probably one of my most inspired ideas to date.   I removed a fruit from the straw, as pictured above, and cut it into a heart shape, and tudahhh, a honeycomb heart.

Well I think I've carried on enough for now, see you all later and please go check out Tims blog for more inspiration.

Enjoy Art Everyday

love Deb xoxo 

Monday 30 January 2012

Heritage Page Catch Up

Just a quick post to add the list of products used in my Aunt Lillian Heritage Page, I forgot to add it to the previous post as stated, oops.   Once I started listing I was really surprised by just how many things I had actually used.


Prima, Printery Collection – Signature; Kaiser 6 ½” Paper Pad, Black and White Timeless – various pages; Tim Holtz Distress Stains – faded jeans, tea dye & picket fence; Tim Holtz Distress Ink -  vintage photo, pumice stone; Tim Holtz Alcohol Inks – Cranberry & Lettuce: Ingvild Bolme Chalk Ink – vintage pink, olive vine; Prima flowers; Kaiser flowers; Tim Holtz Swivel Clasp & Philosophy tag: Kaiser Rhinestones - Clear; Copic Pen  - B97 Night Blue; Brads, butterfly, key, leather thong and lace from stash.   Ingvild Bolme Distress Tool; Tim Holtz Alterations Dies – Vintage Valise and Sewing Room; Big Shot.

Whew, its amazing isn't it, all of that on one little page

Enjoy Art Every Day

Love Deb xo

Saturday 28 January 2012

Busy Days

I've had a couple of busy days at the craft table.    Firstly I finished my 3rd tag for the Soul Scrappers Project 52 Challenge, see separate posts for these. Then I finished a set of Easter Cards for an Easter Card Swap with Aussie members of Soul Scrappers, I'll have to work out how to embed links so you can pop over and check these sights out.    I will share photos of the Easter Cards once the challenge is complete.


My third project was this beautiful mannequin


This was offered as a class at Paper Flourish back in September last year, I missed the class, but the fantastic girls at PF made me up a kit and supplied a couple of photos, the following photo is the original designed by Mandii Van Brussell.


Mine varies slightly from the original, I just had to grunge it up a bit, the look on Georgia's face when she saw me screw up the beautiful piece of paper I started with was priceless.

Project 4 was for a card club challenge at, dud da dah, Paper Flourish.   This months challenge was "Outside the Square" ie no square or rectangle cards.  I used a Spellbinder die in my Bigshot to create a cute shaped circular card, while fishing through a stash box I found these paper flowers that I had made 6 months ago, and turned them into cards as well, so 4 "Outside the Square "cards complete.


The final completed project was a page for my heritage album, at Christmas time my sister Lis, gave me some copies of some family photos.   Lis has been slowly working her way through Mums 20 plus photo albums, our Mum passed away almost 5 years ago. I didn't mean that as a dig about the time taken, just to let you know when Mum died.

All of the photos are fantastic, but one really attracted me and I've been thinking about it on and off.  On another fishing trip through a stash box I found some lace from my Mums craft stash and my page grew from that.


My page, see below for products used

Great Aunt Lillian May Letch 1906 - 1984

The lace from Mum's stash, a bit Grunged now lol


Of course I didn't work on these one at a time, I was jumping back and forth from one project to another.    I also worked on some gifts for Pay It Forward 2012, and some cards for the gift shop.

Whew, I'm bushed from typing it, but feel great to have completed these things

Bring on tomorrow

Enjoy Art Every Day

Love Deb xoxo

Tuesday 24 January 2012

The First and the Latest

Hello All,

I thought I would share a little of my Scrap Booking history.I first learnt about Scrapping in December of 2002, (I think I'd heard of it before, but didn't realise exactly what it was), I was browsing through a magazine in my doc's office and came across an article on OTP (Off the Page) Scrapping.The author was using her scrapping skills to create framed art works.

Later that arvo I was given some photos of my beautiful step-daughter Skye at her formal.  Well as soon as I saw them I knew I had to have a go at this scrapping thing.
Here it is, I took it out of it's frame to photograph it.


At the time I was into Folk Art, so I pulled out my painting supplies and went for it.

I used Jo Sonja Acrylic Gouche and Crackle Medium to create the background.   Traced around some cups and plates to create the frames and painted them with Jo Sonja's.   Then used a stencil to hand cut the title and painted it.

Personally I think I did a pretty good job after reading just one article.

SO that was it, I was hooked, I started buying and borrowing Scrap Mags and slowly taught myself about this wonderful craft.

My eldest daughter, Annie turned 18 in 2005, I made photo banners for the party, lots of photos and little quips( I now know this was journalling) about her life.   After the party I turned the banners into a scrap album, after that I started albums for holidays, our wedding, my heritage, my two younger daughters, and yes, I'm still working on all of them lol.

Late in 2005 I attended my very first class, with the amazing Lorraine Knight, a very talented artist and my eyes were really opened to the scope of this craft.

Now 6 and a bit years on I think I'm evolving into quite a talented Scrapper, I still have lots to learn, and I take regular classes at Paper Flourish (I'll add a link to their site in my side bar), it's a fantastic shop with extremely talented teachers, at a recent class we created this page, designed by Janine Kozcwara.


My lovely Stevie at Kindy.


When I got home from class I used the left overs from the kit, and some of my stash, to create a partner page for it.


Luckily I own the spellbinder die that we had used in class.

I had some doilies in my stash and inked and Glimmer Misted them to match.


A matching title from the sticker sheet ties the two together perfectly.

And I still have enough left overs from the class to make at least a half a dozen cards.


I hope that you agree that I have come quite a long way, and I hope you enjoy coming back to my blog to check on my continuing creative journey.


Enjoy Art Every Day

Love Deb xox